Posts with the Tag Services:

  • A Data Publisher's Diary: Wide Images in DASCH

    An Aladin screenshot with many green squares overplotted on a DSS image sized 20×15 degrees.

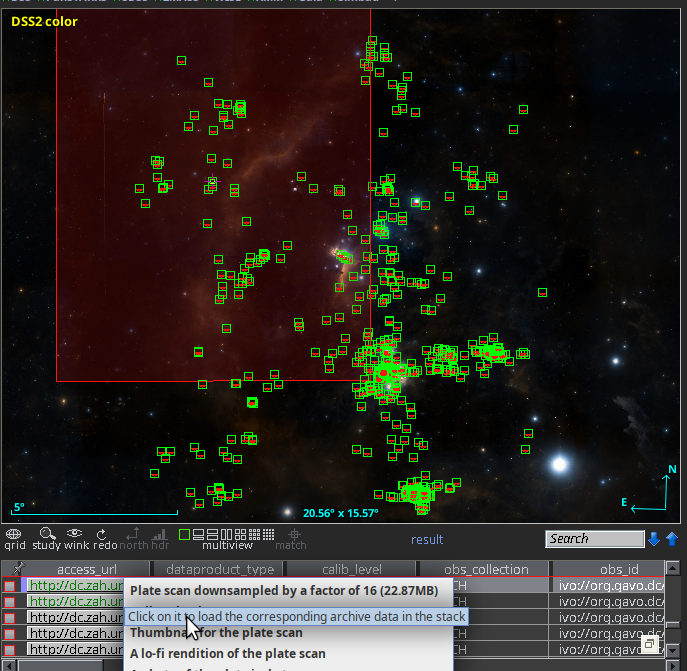
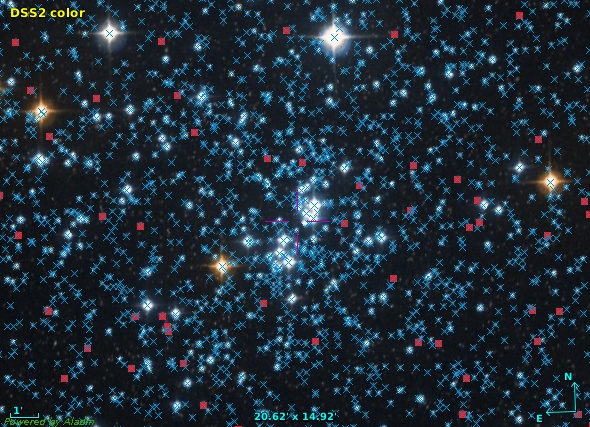
    This is the new resonse when you query the DASCH SIAP service for Aladin's default view on the horsehead nebula. As you can see, at least the returned images no longer are distributed over half of the sky (note the size of the view).

    The first reaction I got when the new DASCH in the VO service hit Aladin was: “your SIAP service is broken, it just dumps all images it has at me rather than honouring my positional constraint.”

    I have to admit I was intially confused as well when an in-view search from Aladin came back with images with centres on almost half the sky as shown in my DASCH-in-Aladin illustration. But no, the computer did the right thing. The matching images in fact did have pixels in the field of view. They were just really wide field exposures, made to “patrol” large parts of the sky or to count meteors.

    DASCH's own web interface keeps these plates out of the casual users' views, too. I am following this example now by having two tables, dasch.narrow_plates (the “narrow” here follows DASCH's nomenclature; of course, most plates in there would still count as wide-field in most other contexts) and dasch.wide_plates. And because the wide plates are probably not very helpful to modern mainstream astronomers, only the narrow plates are searched by the SIAP2 service, and only they are included with obscore.

    In addition to giving you a little glimpse into the decisions one has to make when running a data centre, I wrote this post because making a provisional (in the end, I will follow DASCH's classification, of course) split betwenn “wide” and “narrow” plates involved a bit of simple ADQL that may still be not totally obvious and hence may merit a few words.

    My first realisation was that the problem is less one of pixel scale (it might also be) but of the large coverage. How do we figure out the coverage of the various instruments? Well, to be robust against errors in the astrometric calibration (these happen), let us average; and average over the area of the polygon we have in s_region, for which there is a convenient ADQL function. That is:

    SELECT instrument_name, avg(area(s_region)) as meanarea
    FROM dasch.plates
    GROUP BY instrument_name
    

    It is the power of ADQL aggregate function that for this characterisation of the data, you only need to download a few kilobytes, the equivalent of the following histogram and table:

    A histogram with a peak of about 20 at zero, with groups of bars going all the way beyond 4000.  The abscissa is marked “meanarea/deg**2”.
    Instrument Name mean size [sqdeg]
    Eastman Aero-Ektar K-24 Lens on a K-1...  
    Cerro Tololo 4 meter  
    Logbook Only. Pages without plates.  
    Roe 6-inch  
    Palomar Sky Survey (POSS)  
    1.5 inch Ross (short focus) 4284.199799877725
    Patrol cameras 4220.802442888225
    1.5-inch Ross-Xpress 4198.678060743206
    2.8-inch Kodak Aero-Ektar 3520.3257323233624
    KE Camera with Installed Rough Focus 3387.5206396388453
    Eastman Aero-Ektar K-24 Lens on a K-1... 3370.5283986677637
    Eastman Aero-Ektar K-24 Lens on a K-1... 3365.539790633015
    3 inch Perkin-Zeiss Lens 1966.1600884072298
    3 inch Ross-Tessar Lens 1529.7113188540836
    2.6-inch Zeiss-Tessar 1516.7996790591587
    Air Force Camera 1420.6928219265849
    K-19 Air Force Camera 1414.074101143854
    1.5 in Cooke "Long Focus" 1220.3028263587332
    1 in Cook Lens #832 Series renamed fr... 1215.1434235932702
    1-inch 1209.8102811770807
    1.5-inch Cooke Lenses 1209.7721123964636
    2.5 inch Cooke Lens 1160.1641223648048
    2.5-inch Ross Portrait Lens 1137.0908812243645
    Damons South Yellow 1106.5016573891376
    Damons South Red 1103.327982978934
    Damons North Red 1101.8455616455205
    Damons North Blue 1093.8380971825375
    Damons North Yellow 1092.9407550755682
    New Cooke Lens 1087.918570304363
    Damons South Blue 1081.7800084709982
    2.5 inch Voigtlander (Little Bache or... 548.7147592220762
    NULL 534.9269386355818
    3-inch Ross Fecker 529.9219051692568
    3-inch Ross 506.6278856912204
    3-inch Elmer Ross 503.7932693652602
    4-inch Ross Lundin 310.7279860552893
    4-inch Cooke (1-327) 132.690621660727
    4-inch Cooke Lens 129.39637516917298
    8-inch Bache Doublet 113.96821604869973
    10-inch Metcalf Triplet 99.24964308212328
    4-inch Voightlander Lens 98.07368690379751
    8-inch Draper Doublet 94.57937153909593
    8-inch Ross Lundin 94.5685388440282
    8-inch Brashear Lens 37.40061588712761
    16-inch Metcalf Doublet (Refigured af... 33.61565584978583
    24-33 in Jewett Schmidt 32.95324914757339
    Asiago Observatory 92/67 cm Schmidt 32.71623733985344
    12-inch Metcalf Doublet 31.35112644688316
    24-inch Bruce Doublet 22.10390937657793
    7.5-inch Cooke/Clark Refractor at Mar... 14.625992810622787
    Positives 12.600189007151709
    YSO Double Astrograph 10.770798601877804
    32-36 inch BakerSchmidt 10 1/2 inch r... 10.675406541122827
    13-inch Boyden Refractor 6.409447066606171
    11-inch Draper Refractor 5.134521254785461
    24-inch Clark Reflector 3.191361603405415
    Lowel 40 inch reflector 1.213284257086087
    200 inch Hale Telescope 0.18792105301170514

    For the instruments with an empty mean size, no astrometric calibrations have been created yet. To get a feeling for what these numbers mean, recall that the celestial sphere has an area of 4 π rad², that is, 4⋅180²/π or 42'000 square degrees. So, some instruments here indeed covered 20% of the night sky in one go.

    I was undecided between cutting at 150 (there is a fairly pronounced gap there) or at 50 (the gap there is even more pronounced) square degrees and provisionally went for 150 (note that this might still change in the coming days), mainly because of the distribution of the plates.

    You see, the histogram above is about instruments. To assess the consequences of choosing one cut or the other, I would like to know how many images a given cut will remove from our SIAP and ObsTAP services. Well, aggregate functions to the rescue again:

    SELECT ROUND(AREA(s_region)/100)*100 AS platebin, count(*) AS ct
    FROM dasch.plates
    GROUP BY platebin
    

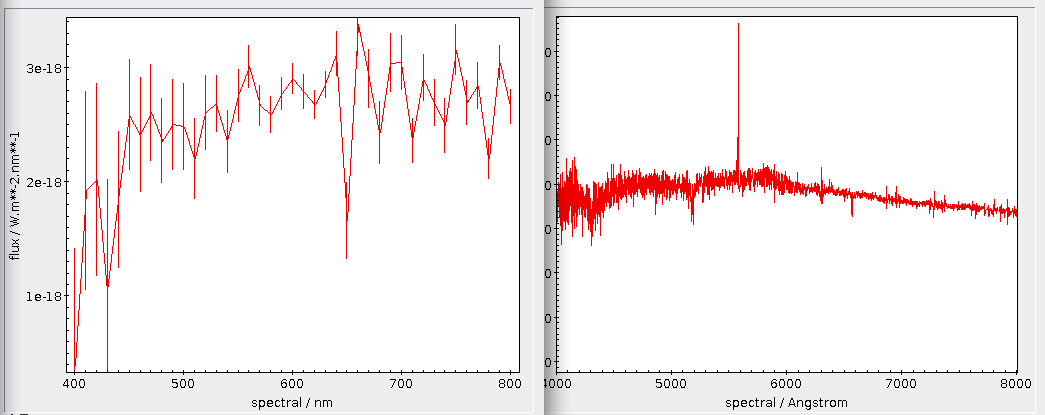
    To plot such a pre-computed histogram in TOPCAT, tell the histogram plot window to use ct as the weight, and you will see something like this:

    A wide histogram with a high peak at about 50, rising to 1.2e5. Another noticeable concentration is around 1250, and there is signifiant weight also approaching 450 from the left.

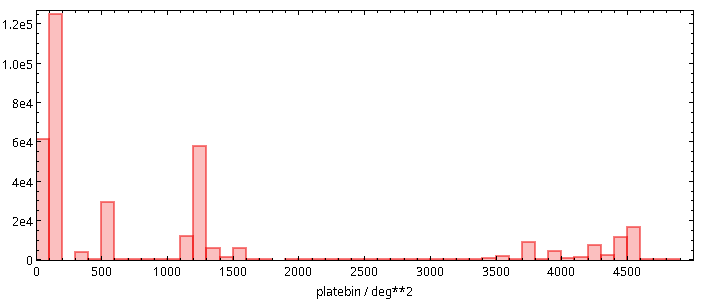
    It was this histogram that made me pick 150 deg² as the cutoff point for what should be discoverable in all-VO queries: I simply wanted to retain the plates in the second bar from left.

  • Gaia DR3 XP Spectra: All Sampled

    Lots of blue crosses and a few red squares plotted over a sky photograph of a star cluster

    Around this time of the year on the northern hemisphere, you can spot the h and χ Persei double star cluster with the naked eye. One part of it, NGC 884 is shown here with LAMOST DR6 low resolution spectra (red squares) and Gaia DR3 XP spectra (blue crosses) overplotted. Given that LAMOST has already been one of the largest collections of spectra on the planet, you can see that there is really a lot of those XP spectra.

    When Gaia DR3 was released in June, I was somewhat disappointed when I realised what it is that they delivered as the BP/RP (or XP for short) spectra. You see, I had expected to see something rather similar to what I have in DFBS: structurally, arrays of a few dozen spectral points, mapping wavelengths to some sort of measure of the flux.

    What really came were, mainly, “continuous spectra“, that is coefficients of Gauss-Hermite polynomials. You can fetch them from the gaiadr3.xp_continuous_mean_spectrum table at the ARI-Gaia TAP service; the blue part of the spectrum of the star DR3 4295806720 looks like this in there:

    102.93398893929992, -12.336921213781045, -2.668856168170544, -0.12631176306793765, -0.9347021092539146, 0.05636787290132809, [...]

    No common spectral client can plot this. The Gaia DPAC has helpfully provided a Python library called GaiaXPy to turn these into “proper” spectra. Shortly after the data release, my plan has thus been to turn all these spectra into their “sampled” form using GaiaXPy and then re-publish them, both through SSAP for ad-hoc discovery and through TAP for (potentially) global analysis.

    Alas, for objects too faint to make it into DR3's xp_sampled_mean_spectrum table (that's 35 million spectra already turned to wavelength-flux pairs by DPAC), the spectra generated in this way looked fairly awful, with lots of very artificial-looking wiggles (“ringing”, if you will). After a bit of deliberation, I realised that when the errors are given on the Hermite coefficients, once you compute the samples, these errors will be liberally distributed among the output samples. In other words, the error on the samples will be grossly correlated over arbitrary distances; at least I am fairly helpless when trying to separate signal from artefact in these beasts.

    Bummer. Well, fortunately, Rene Andrae from “up the mountain” (i.e., the MPI for Astronomy) has worked out a reasonably elegant way to get more conventional spectra understandable to mere humans. Basically, you compute n distinct “realisations” of the error model given by the table of the continuous spectra and average over them. The more samples you take, the less correlated your spectral points and their errors will be and the less confusing the signal will be. The service docs for gaia/s3 give the math.

    Doing this on more than 200 million spectra is quite an effort, though, and so after some experimentation I decided to settle on 10 realisations per spectrum and have relatively wide bins (10 nm) over just the optical part of the spectrum (400 through 800 nm). The BP and RP bandpaths are a bit wider, and there is probably signal blotted out by the wide bins; I will probably be addressing this for DR4, except if these spectra become the smash hit they deserve to be.

    The result of this procedure is now available through an SSAP service that should show up in the VO Registry by the time the first of you read this; the Aladin image above gives you an impression of the density of results here – and don't forget: the spectra with the blue crosses are all reasonably well flux-calibrated.

    The data is also available on the TAP service http://dc.g-vo.org/tap, which opens up many interesting possibilities. Let me mention two here.

    Comparison with LAMOST

    I was rather nervous whether what I had done resulted in anything that bore even a fleeting resemblance to reality, and so about the first thing I tried was to compare my new data with what LAMOST has.

    That is a nice exercise for TAP and ADQL. Let's first match spectra from the two surveys, which luckily are on the same server, saving us some cross-server uploads. I am selecting a minimum of data, just the position and the two access URLs, and I let DaCHS' MAXREC kick in so I'm just retrieving 20000 of the millions of result records:

    SELECT a.ssa_location, a.accref, b.accref
    FROM
      gdr3spec.ssameta AS a
      JOIN lamost6.ssa_lrs AS b
      ON DISTANCE(a.ssa_location, b.ssa_location)<0.001
    

    (this is using the DISTANCE(.,.)<radius idiom that we will be migrating towards in ADQL 2.1 instead of the dreaded 1=CONTAINS(POINT, CIRCLE) thing everyone has loathed in ADQL 2.0).

    Using the nifty activation actions, you can now tell TOPCAT to open the two spectra next to each other when you click on a row or a point in a sky plot. To reproduce,

    1. Make a sky plot. TOPCAT doesn't yet pick up the POINT in ssa_location, so you have to configure the Lon and Lat fields yourself to ssa_location[0] and ssa_location[1].
    2. Open the activation actions, either from the button bar or from the Views menu.
    3. In there, select Plot Table, make sure it says accref in Table Location and then check Plot Table in the Actions pane. When you now click on a point in the sky plot, you should see a spectrum pop up, except it is plotted with dots, which most people consider inappropriate for spectra. Use the Form tab in the plot window to style it a bit more spectrum-like (I recommend looking into Line and XYError).
    4. But how do you now add the LAMOST plot? I don't think TOPCAT's activation actions let you plot right into the plane plot you just configured. But you can add a second Plot Table action from the Actions menu in the window with the activation actions. As before, configure this new item, except this one needs to plot accref_ (which is what DaCHS has called the access reference for LAMOST to keep the names unique).
    5. As for Gaia, configure to plot to look good as a spectrum. In order to make the two spectra optically comparable, under Axes set the range to 4000 to 8000 Angstrom manually here.

    You can now click on points in your sky plot and, after a second or so, see the corresponding spectra next to each other (if you place the two plot windows that way).

    If you try this, you will (hopefully) see that major features of spectra are nicely reproduced, such as with these, I guess, molecular bands:

    Two line plots next to each other, the right one showing more features.  the left one roughly follows the major wiggles, though.

    As you probably have guessed, the extremely low-resolution Gaia XP spectrum is left, LAMOST's (somewhat higher-resolution) low-resolution spectrum is right:

    This also works with absorption in the blue, as in this example:

    Two line plots next to each other, the right one showing a lot of relatively sharp absoprtion lines, which the left one does not have.  A few major bumps are present in both, and the general shape conincides nicely, expect perhaps at the blue edge.

    In case of doubt, I have to say I'd probably trust Gaia's calibration around 400 nm better than LAMOST's. But that's mere guesswork.

    For fainter objects, you will see remnants of the systematic wiggles from the Hermite polynomials:

    Two line plots next to each other.  Both are relatively noisy, in particular on the blue edge.  The left one also seems to have a rather regular oscillation at the blue edge.

    Anyway, if you keep an eye on the errors, you can probably even work with spectra from the fainter objects:

    Two line plots next to each other.  The left one has fairly strong ringing which is not present in the right one, but it mainly stays within the error bars.  The total flux of this star is at least a factor of 10 less than for the prettier examples above.

    Mass Retrieval of Spectra

    One nice thing about the short spectra is that you can fetch many of them in one go and in very little time. For instance, to retrieve particularly red objects from the Gaia catalogue of Nearby Stars (also on the GAVO server) with spectra, say:

    SELECT
      source_id, ra, dec, parallax, phot_g_mean_mag,
      phot_bp_mean_mag, phot_rp_mean_mag, ruwe, adoptedrv,
      flux, flux_error
    FROM gcns.main
    JOIN gdr3spec.spectra
    USING (source_id)
    WHERE phot_rp_mean_mag<phot_bp_mean_mag-4
    

    [in case you wonder how I quickly got the column names enumerated here: do control-clicks into the Columns pane in TOCPAT's TAP window and then use the Cols button]. For when you do not have Gaia DR3 source_id-s in your source table, there is also gdr3spec.withpos against which you can do more conventional positional crossmatches.

    Within a few seconds, you can retrieve more than 4000 spectra in this way. You can now do whatever analysis you want on these spectra. Or, well, just plot them. The following procedure for that later task uses TOPCAT features only available in the next release, due before mid-October[1].

    First, make a colour-magnitude diagram (CMD) from this table as usual (e.g., BP-RP vs G). Then, open another plane plot and

    1. LayersAdd XYArray Control
    2. Configure the XYArray to plot from the table you just fetched, have nothing in X Values[2] and flux in Y Values.
    3. Under Axes, configure Y Log in order to better show the 4253 spectra at one time.
    4. Throw away or at least uncheck all other layers in the plot.
    5. In order to let TOPCAT highlight the spectrum of the activated source, in the Subsets pane check the Activated subset (that's the bleeding-edge functionality you will not have in older TOPCATs) and give it a sufficiently bright colour.

    With that, you can now click around in your CMD and immediately see that source's spectrum in the context of all the others, like this:

    An animation of someone selecting various points in a CMD and have simulataneous spectra plotted.

    These spectra have also inspired me to design and implement a vector extension for ADQL, which lets you do even more interesting things with these spectra. More on this… soon.

    [1]The Activated subset is only available in TOPCAT versions later than 4.8-7 (released in October 2022).
    [2]These should be the spectral points; DaCHS does not deliver them with this query because I am a coward. I think I will find my courage relatively soon and then fix this. Once that has happened, you can select param$spectral as X values. [Update: Mark Taylor remarks that by writing sequence(41, 400, 10) in bleeding-edge TOPCATs and add(multiply(10,sequence(41)),400) before that, you can add a proper spectral axis until then]
  • Register your stuff with purx!

    TOPCAT Screenshot

    If you open the TAP dialog of TOPCAT, what you see is Registry content.

    The VO Registry lets people find astronomical resources (which is jargon for “dataset, service, or stuff“). Currently, most of its users don't even notice they're using the Registry, as when TOPCAT just magically lists what TAP services are available (image above) – but there are also interfaces that let you directly interact with the registry, for instance GAVO's WIRR service or ESAVO's Registry Search.

    Arguably, the usefulness of the Registry scales with its completeness. With sufficient completeness, the domain-specific, structured metadata will also make it interesting for generic discovery of astronomical data; in a quip, looking for UCDs in google will never work quite well – and without that, it's hard to find things with queries like „radio fluxes of early-type stars”.

    Either way: If you have a data set or a service dealing with astronomy, it'd be great if you could register it. To do this, so far you either had to set up a publishing registry, which is nontrivial even if you have a software that natively speaks a protocol called OAI-PMH (DaCHS does, but most other publishing suites don't) or you could use one of two web interfaces to define your resource (notes for a talk on this I gave in 2016).

    Neither of these options is really attractive if you publish only a few resources (so the overhead of running a publishing registry looks excessive) that change now and then (so using a web browser to update the resource records again and again is tedious). Therefore, GAVO has developed purx, the publishing registry proxy. We've officially announced it during the recent Southern Spring Interop in Santiago de Chile (Program), and the lecture notes for that talk are probably a good introduction to what this is about.

    If you're running VO services and have not registered them so far, you probably want to read both these notes and the service documentation. If, on the other hand, you just have a web-published directory of files or a browser-based service, you probably can skip even that. Just grab a sample record (use the one for a simple browser service in both cases) and adapt it to what's fitting for your website. Then put the resulting file online somewhere and paste the URL of that location on purx' enrollment service. In case you're uncertain about some of the terms in the record, perhaps our crib sheet for metadata we ask our data providers for will be helpful.

    There's really no excuse any more for not being in the Registry!

Page 1 / 1